Friday, April 17, 2015

BRAIDED CROWN TUTORIAL

Hey Beauties! I recently purchased a really nice camera so I could start filming real tutorials for you all and I'm so excited to share my first one with you!! I decided to do my favorite hairstyle, the Braided Crown. This style took me under five minutes to do! It's so simple and so easy to do! If any of you have questions about this Style or want to see something specific email me at Sierrasbeauties@gmail.com 
hope you all enjoy this video! Make sure to subscribe to my channel to see more! 

Xx
Sierra 

http://youtu.be/oh2xpX2eL6E


Tuesday, March 10, 2015

Blonde & Regular Color Corrections!

Hey Beauties! It's been a while since I posted because I'm actually working on a brand new website! I've also been very busy with clients so I apologize for my absence. 

Today I'm talking about blonde color corrections and normal color corrections. What is a blonde color correction and how does it differ from a normal color correction? Well typically a blonde color correction is someone who has dark hair wanting to go blonde. A normal color correction is usually someone who used box color on their hair themselves and now needs it fixed. 

I recently had a client come in for a blonde color correction and she was not happy her black hair that was now orange from someone else coloring it, wasn't white blonde in one appointment. To me it made perfect sense, but to her and probably a lot of others they have no idea why I can't take your almost black hair or even orange hair, a beautiful sun kissed blonde in one appointment. So here I am to give you the low down on color corrections! 

First of all a lot of stylists want to make their clients happy and will promise things they can't do (unless you want all your hair to break off and fall out) and that always results in an unhappy client with damaged hair. It's hard for us stylist to tell clients we can't get their desired results that day. We always want to have our clients leave with their perfect hair, but with color corrections that's not always the case. It's so important for me to educate my clients on their hair and what we are doing so we don't have those moments of unhappiness. Typically You should expect it to take your hair about a year to get from a dark color to blonde. This is just a general time line so some may take less or more time, but for the most part your looking at a year long process. Why you ask? Well here's a very basic answer. (If you want to know exact information please email me) When you color your hair dark you are filling the hair cuticles with that dark color making it harder and harder to take out each time. The longer you have colored your hair dark the longer it will take to color it blonde. Here are a few things you need to think about before you decide to go blonde from dark: 
1. Are you willing to be patient and take the time to do it right and be patient with your hair AND your stylist? 
2. Are you willing to have your hair turn orange and/or yellow at some point in the process? 
3. Are you willing to spend the money to to have it done right and not damage your hair completely? 

You might be concerned about number 2 and why your hair will be orange or yellow. That is because that's what dark color looks like with Lightener over it. It's an unavoidable stage of the blonde process. A lot of people don't know this though and freak out and think the stylist did something wrong. They didn't do anything wrong though it just means you're one step closer to achieving the color you want. It's an unfortunate and very not fun part of this process. Now there are two different routes you can take with color corrections, the cheap version or the right version that is not going to be very cheap. A lot of people try to save money and color their hair by themselves with box color and all I have to say about this is DONT DO IT!! You end up having to pay more for a stylist to fix your hair. I had a client come in with red box color from Walmart she had done the night before. She wanted it to be a light ash brown and spend as little as possible. Well to achieve that brown I would have to strip her hair of all the color, bleach it out, and then color it light brown. That normally would price out at about $140+ and she didn't want to spend that. So her second option was to just do an all over color which is about $85 with a really dark brown to cover the red and hopefully it would cover it all and not fade too fast. She choose the second option to save money, but I couldn't guarentee the red would all cover. Trust me it's worth it to spend the extra money to have it done right!! 

Now I want to talk to about the amazing product Olaplex that I use on all my blonde color corrections (and any client with damaged hair.) What Olaplex basically does is repair the bonds in your hair as it lifts the color to blonde. When you color your hair it is breaking bonds and that results in breakage. Olaplex restores those bonds and leaves the hair intact. Now we can speed up the blonde process and we can do colors that otherwise would result in a lot of breakage. Olaplex is not a magic wand though. We still cannot go from black to white blonde in one appointment. It is however pretty amazing. I can get a client much more blonde in one appointment with their hair still healthy that would otherwise probably take me two or three appointments. Every client I have used it on has left with even healthier hair than when they came in. I absolutely recommend going to a stylist that uses Olaplex if you're going blonde from dark or have super damaged hair. 

Hopefully I have covered everything you need to know about color corrections, but don't hesitate to email me if you have any other questions :) I'll post some pictures below of two color corrections I did recently and tell you what I did :)  

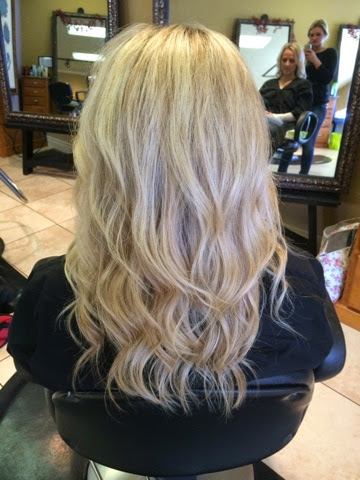
This is Lida. She Had her hair colored black in October of 2013 by another stylist. (This is faded a bit from what it was) she didn't love the dark and started going back blonde. She didn't want any damage done to her hair so she went really slow with the process. 
This was a year and a half after trying to go blonde. Her previous stylist was only touching up her roots every time to avoid damage on her ends. While it's good to avoid damage when going blonde from dark you have to expect some damage and need to go to the ends every time or every other time or you get all the different lines of color you see in her hair. Like I said before Olaplex is the best to use in these situations because I can go all the way to her ends with little to no damage! 
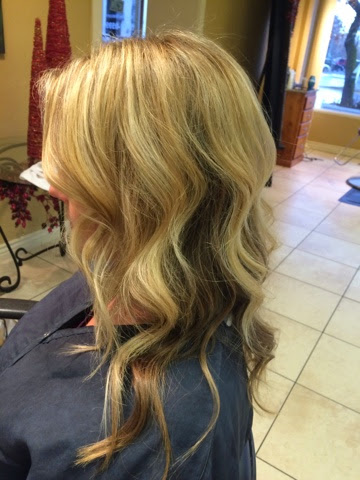
Here is the final result!! For her color I used Joico Lightener With 20 vol. through the front and 30 vol. through the back. Lida was so concerned about her hair breaking off, but because we used Olaplex I only had about 15 strands of hair in my brush! You lose more hair than that every day! You can even tell that it looks much more healthy in her after picture because of Olaplex. After she processed I toned her with Aloxxi Romance On The Rialto (10P lightest violet ash blonde) before Olaplex getting that much dark out in one appointment would have left her ends fried and we would have had to do it in 3 or 4 appointments. We still need to color her once more to get it perfect, but I'm more than happy with how it turned out!! 

Color Correction #2 
This client came in and wanted us to fix her red she had just done the night before. She used box color from Walmart and that is such a big no no!! She was trying to save money (like I mentioned before) but ended up costing herself more and didn't get the results she wanted. I'll probably repeat myself a few times here so I'll apologize in advance. She asked me to take her to a light ash brown and showed me pictures of girls with level 7-8 hair color. (That's like a dirty blonde) Now this is where communication comes into play and showing clients what the different colors and levels are is so important. I'll expand on this a little later. I gave her two options for this. One was to strip all the red from her hair, Lighten her hair, and then put the light brown or dark blonde color over top. That would be a lengthy, and expensive process though, but give her exactly what she wanted. Her second option was to put a darker brown than she wanted (at least a level 5) on as an all over color to cover up the red. There was no guarentee though that the red would completely cover and if it did, wouldn't start to show once her color began to fade. I also had no idea what other colors were on her hair and how this would react. This option was much cheaper though being an all over with Olaplex on her hair length was $85 and the color correction she wanted was $140+. My suggestion to her and anyone is to save up to have it done right. I know we hate to walk around with our hair all messed up, but trust me it will save you time and money in the future!! You won't have to come back so often to cover that red or whatever color is underneath. Now let's see her results! 
It turned out much better than I anticipated! You can still see the tint of red in her hair, but it looks more natural and like it's supposed to be there rather than just red splotches everywhere. I ended up putting Aloxxi's Full of Bologna (5A Light Ash Brown) with 10 vol. and Olaplex. This is where that communication I was talking about comes into play. If she had just told me a light ash brown I would have taken out my 5A and put it all over and thought I had got a perfect color. Color means different things to everyone so it's so important as a client to show pictures and really communicate what you want. It's also extremely important on my part to educate my clients on the different colors and options they have with their hair. Now let's get back to her color. I let her sit under heat for 30 minutes and then washed her with Smooth Sexy Hair's smoothing Shampoo and Conditoner. Another stylist at the salon actually cut her hair because of a scheduling conflict. I think considering everything she had on her hair it turned out pretty darn good. She was pleased with it and at the end of the day that's all that matters. Thanks for reading beauties!! And next time you go to throw box color on your hair DONT! And come see me! Much love! 

Xx 
Sierra 

Monday, January 19, 2015

Braided Crown Tutorial FINALLY!!!

I have a love/hate relationship with technology right now. I got a new phone and Blogger decided it didn't want to work on this new phone. (My need for a laptop grows greater each day) because of this I haven't been able to post for a bit! Good news though! I'm in the process of creating a brand new website and I cannot wait to launch it!! It will be more accessible and more professional  (thanks to my sweet hubby!) I'm super excited for this, but for now I'll put my braided crown tutorial up on here and pray it works!! 

Start at one ear and start to French braid your hair....
Continue the French braid along the back of your head...
Ending at the other ear and starting a side braid. 
I like to pull a few front pieces out at this point. You can do this or try it without! Once you've pulled some pieces out (or not) continue your side braid...
All the way to the ends of your hair. 
Now take the end of your braid and pull it straight up and over your head from one ear to the other. (So easy right?) 
Now make sure the sides look how you want them to and that it reaches over far enough and then bobby pin the end of the braid to make it stay. (I usually have to redo my side braid a couple times to get it to go across just right.) 
Pull apart the braid if you want a more loose look and then start to bobby pin along the braid. I usually uses quite a few bobby pins to make sure it stays in place! 
And there you have your braided crown!! It's much easier than it looks so go ahead and try it out! I'd love to see your remake of this tutorial so make sure to tag me on Instagram on your posts @sierrasbeauties have a wonderful week beauties! 

Xx 
 photo SierraSIG_zpsf25d1fac.png
 

Wednesday, December 31, 2014

NEW YEAR'S EVE HAIR-SPIRATION

When I think of New Years Eve the words glitz and glam come to mind! Everything should have sparkles and glitter on it! If you're like me then you're going to love the New Years Eve hair-spiration I came up with!! 

I collaborated with the amazing Ashley Rae Jensen (shleeeeeeeeee if you follow her on Instagram) and Janessa Gornichec to bring this amazing New Year's Eve look to ya'll! If you want to recreate this look for your New Year's Eve party tonight I put up the details of this shoot after all the pictures. 

This look is super easy to create and looks stunning. I started out by sectioning off a square on the very top of her head. From there I braided two side pieces and left them down. After the two braids were done I bobby pinned the models bangs back and then started an inside out French braid all the way down the back. After the braid was finished I started pulling it apart making it look messy and not so tight. I took my two side braids next and pinned them in the middle of the French braid hiding the ends under the hair. After that I took bobby pins and started pinning the braid up. I tucked the bottom of the braid underneath and bobby pinned it in place. I just kept pinning until I felt it looked good and how I wanted it. Now it's your turn to try it out! Remember to tag me (@sierrasbeauties) in any pics you take when trying out my styles and you could be featured on my insta or blog! HAPPY NEW YEAR BEAUTIES!! 

Xx 
 photo SierraSIG_zpsf25d1fac.png

Thursday, December 4, 2014

My Christmas Wish List!

SANTA!! I KNOW HIM!! Oh how I love Elf and Christmas! I think I'd be crazy if I didn't say this was my favorite time of year! I sometimes can't help but let my inner kid out, especially when it comes to writing my Christmas wish list to Santa! This year I'm sharing my wish list with you because you all need everything on this list too! (Trust me) 

1. Red Lips are a must during the holiday season am I right? And I know we all spend forever trying to find just the right red, so look no further I've found the perfect one! It's the "Primal" Precision Pencil Liner from Younique! This stuff is golden and only $15! A perfect stocking stuffer! I can drink hot chocolate, eat food, kiss my hubby ;) and it never comes off! (I forgot to take my makeup off one night and woke up with still amazing red lips! Yeah I love it.) Just make sure you don't add Chapstick or lipgloss to it or it will come off easily! The fact that it's a lip liner also makes it so I can switch up the intensity of the color. I like to tone it down during the day for a more casual look and barely shade my lips to give them a nice red tint, and then spice it up for date nights and Christmas parties applying two or three coats to get a deep red lip color. Can you see now why this is a must for your list to Santa!? (You can order this lip liner directly from me but orders must be in by the 15th to get them in time for Christmas so email me at sierrasbeauties@gmail.com and I'll pass the message along to Santa ;) hehe) 

Mistletoe ready ;) 


It's Casual Friday....for your lips! 


2. Tie headbands are in and earmuffs are out! No one said you couldn't look cute while covering your ears up....Okay they might not keep you that warm, but you sure will look cute! I've seen too many cute headbands lately, but my favorites are from My Dear Faye! They are all handmade in Salt Lake City and probably the most affordable ones I've seen at only $12! PLUS she has handmade tunics that are the bomb and go great with her cute headbands. This is definitely top priority on my wish list this year! (Follow _mydearfaye on insta to get your killer headband and tunic!) 


3. Glitter leggings. Need I say more? This should be a must on everyone's wish list! Not only will I wear these to every Christmas party I go to I'll probably wear them the entire year! Now I've done lots of research on these babies and found the best price for you all! Head over to Instagram and follow @poppyanddot to get yours! 


4. When you drink hot chocolate as much as I do you need a Christmas Mug.  I got my cute mug at target for only $2.99. Hello can you say great deal? I also found the cutest cookie cutters there for only .79 cents! 


5. Fleece Lined Fur Coat! I've never worn anything so comfy and warm in my life. I honestly could sleep in this coat! I found this on one of my favorite websites to do online shopping from sheinside.com they have 8 different colors to choose from and its on sale right now for only $53.33! 

6. A Rockwell watch should be on everyone's list this year wether it's for yourself or a loved one! Best quality and style I've ever seen! They have watches for everyone's price range as well! Head over to rockwellwatches.com and check out all their watches! Here are just a few of my favorites! Can you tell I like rose gold?  (email me at sierrasbeauties@gmail.com to get 10% off a watch for Christmas!) 


7. Last on my wish list is my fav 3D Fiber Lash Mascara! I'm definitely putting this in my friends stockings this year as well as my own. ;) I LOVE this stuff! I get killer lashes without all the work and expense of extensions or glue ons! Plus it's good for your eyes! All the ingredients are naturally based and paraben free not to mention It's only $29! (email me at sierrasbeauties@gmail.com to get yours and make sure all orders are in by the 15th!) 
Yes my lashes are real and yes that is all thanks to 3D Mascara!! 
Again all thanks to 3D mascara!! 

With Christmas only 20 days away ya'll getter get working on your letters to Santa! Don't forget all these awesome must haves! Happy Holidays Beauties! 

Xx 
 photo SierraSIG_zpsf25d1fac.png

Tuesday, November 25, 2014

Blonde Babes

I absolutely love blondes and I've been one almost my whole life. But I have noticed that a lot of blondes have the most damaged hair! Stereotypically Blondes tend to have the driest and most fried ends! Because of my experience with damaged blonde hair and not wanting that stereotype anymore I've compiled a list of tips and tricks for getting and keeping blonde hair looking sensational and healthy! So today I'm going to share them with all of you! Enjoy!! 

1. FIND A STYLIST THAT SPECIALIZES IN BLONDES: Many stylist have that one color or cut that they are just bomb at, and anything other than that one style just doesn't turn out well. You must remember this when getting your blonde done. It's easy to slap on an all over color on someone's head, but knowing where to place foils and how thick the weave needs to be is a whole other art in itself. Find someone who has done a lot of blondes and look at their portfolios to see if their work is similar to what you're wanting. Don't be afraid to ask a stylist if she has a lot of experience doing blondes or to ask the salon to set you up with someone that specializes in blondes. You'll thank me later for this piece of advice! If someone isn't great at blondes that could mean the difference between damaged hair or a nice pretty blonde! You also need to be patient when going blonde. Especially if you're really dark to begin with. You want your hair healthy and pretty not fried! It's better to go in a few times or wait a few weeks in between colors to reach the color you're wanting rather than damaging your hair to get it done in one day! 

2. COMMUNICATE WHAT YOU WANT: Blonde is such a vague term. If you type in blonde to google you will get a million different pictures come up and hardly any will look the same color. This is why I always bring pictures to my appointments and encourage my clients to do the same. If you have a picture of exactly what you want it will be pretty hard for the stylist to get it wrong. Also talk to your stylist about your hair. If there are certain parts that don't take color well or that never get colored and you want it colored make sure the stylist knows. Another thing I always ask my clients is if they pull their hair up in pony tail a lot because that will change the placement of my foils. It's the little things we forget to ask about or tell that really affects the end results! I've always said the Number one key to loving your color every time is communication between you and the stylist! Don't forget that! 

3. TAKE CARE OF YOUR HAIR: like I said before Blonde is one of the most damaging colors, but it doesn't mean you have to have damaged hair. I used to be one of those damaged hair blondes but not anymore! Let me share my secrets with you! I take a lot of vitamins! My favorites are prenatal pills, biotin, and fish oil. I just buy the cheap no name brands at target and they work great. I tried the real expensive brands like hairfinity and it works hair skin and nails but the target ones worked just as good or better for me so I decided to save money and just get those! I've noticed a huge change in the health of my hair since taking them though and suggest you take vitamins right away if you don't already! I also try to minimize the usage of heat on my hair! Chances are if you straighten or curl your hair everyday you're going to have pretty fried ends. Try out some new hair styles like braids or buns instead of breaking out the straightener! But be careful when pulling your hair up a lot because your pony tail will break your hair. Try using scrunchies (so 80's I know but they don't damage your hair) or find similar hair bands that will keep the elastic off your hair. Another trick I use to keep my hair healthy is I only wash my hair 2-3 times a week and before you say Ew hear me out. If your hair gets greasy after one day it's probably because you wash it every other day or even everyday. When you wash your hair you are stripping it of its natural oils. So that means when you wash it that often it makes your hair overproduce those oils to try and compensate. It will take you a couple weeks to train your hair to not get oily so fast but it's worth it! You're hair will be healthier I promise! On those days it just gets too greasy though I like to use a dry shampoo or baby powder! My favorite dry shampoo is Bed Heads Rockaholic Dirty Secret Dry Shampoo. You can get it online or email me and order it directly from me and get 10% off until the end of December! Make sure you rub it in really good though so you don't have a white scalp! Now this brings me to my next tip...

4. USE GOOD SHAMPOO & CONDIONTER: Now I know Suave says they are salon approved, but to be blunt it's crap. If you want you're hair to be healthy and nice you have to use good product! I cannot stress this enough and it goes for any hair color!! Buy your shampoo and conditoner from your salon or ask your stylist to get you some from the beauty store! Trust me it's worth it to spend a little extra money to get good stuff! There are tons of different brands out there and they have many that are specifically for blondes! Try out a few different brands, but get the small bottles before you commit to one and get the huge bottles! 
Personally my favorite brand is Colorproof! I use the "Super Rich Moisture" Shampoo and Conditoner but they have all different kinds to suit everyone's different hair needs. You can order yours at colorproof.com or email me and order it directly through me  and get 10% off any colorproof product until the end of December. 

5. BALANCE YOUR PRODUCT USE: it's good to use product in your hair, but not too much. When you have a lot of product build up in your hair (especially when you're only washing a few times a week) when you take a brush through it your ends will just start breaking off. This is especially true with hairspray! I try to keep it simple and not go too crazy with product, but I definitely have a few favorite products I use almost everyday on my hair! 
•"It's a 10" -I love this stuff! It's a heat protect, leave in Conditioner, detangler, and the list goes on!! I use it every time I wash my hair! I only use about five or less squirts though and it gets the job done! 
•"MoroccanOil Treatment"- I took this straight from their website because it explains this stuff so well. "This treatment for hair completely transforms and repairs as its formula transports lost proteins for strength; fatty acids, omega-3 oils and vitamins for shine; and antioxidants for protection. It absorbs instantly to fill gaps in hair created by heat, styling and environmental damage." I use this every other time I wash my hair or when I feel my hair is especially dry! 
•"Osis+ Dust it by Schwarzkopf" - if you're in need of volume this stuff is for you!! It's so awesome to give you that body you need! You only need a tiny bit though!! A little goes a long way! 
•"Platinum Blow Dry Spray by Kenra"- this stuff is heaven in a bottle! It decreases blow-dry time which is awesome because who likes to sit and spend forever blow drying their hair? It also has a heat protection in it and helps detangle, smoothe, and soften your hair! It also Eliminates frizz and resists humidity! Not to mention it smells lovely! I use this every time before I blow dry my hair! 
You can find all of these products online or email me and order it directly from me and get 10% off everything listed above until the end of December! 

Now that I'm done giving you my tips and tricks to keeping your blonde hair looking awesome and healthy let's take a look at a few of my blonde babes!  

Tonya: 

Sheena: 

Nesha: 

Mandy: 

Lindsay:

Xx 
 photo SierraSIG_zpsf25d1fac.png
Lo